2009-03-26

MP Art Collective Q&A


The Metaplace Art Collective (of which I am one of the founders) is hosting a question and answer session with all three of the staff artists from Metaplace. You have a great chance to chat with the folks who actually get paid to create this stuff for a living. Come on by and pick their brains for all of the nuggets of graphical goodness you want!
Since some of these chats tend to be a little wacky LostBetween made a neat little question emoticon. I you want to ask a question during the chat just click on the question mark in the top left corner of the screen and grab a place in line between the red marks on the floor. I hope to see you there!

2009-03-20

He Might Be Giant


I had an idea for a game I'd like to do. I figured I'd complete most of the graphics for it and then team up with one of the Metaplace coders to finish the work off. It has already occurred to me how the graphic set could be used for another game as well. That's one of my biggest complaints about Metaplace right now - the tools offer so much potential! My focus keeps getting scattered as new ideas pop up. So I am trying to buckle down and limit myself to two projects right now. This one and refining my space station so I can publish it as a stylesheet.

Here is a little teaser image. I'm doing something different by trying to create all the buildings in Adobe Illustrator. I've used AI for isometric work before. But Metaplace isometric is slightly different. The work I'd done before required squashing the art 86.602% and then shearing and rotating the pieces through different positive and negative combinations of 30 degrees. I'm still working the last few kinks out but for the Metaplace art to look good it needs an additional squash. Something like 93.301% but I'm still tweaking. Yes, those are crazy numbers! I learned the isometric stuff years ago from a tutorial on the web so I will pay that back by posting a tutorial myself once I finalize the methods.

2009-03-13

Grand Theft Elmo


Haven't flogged my t-shirt design lately - so here we go. You can buy it here.

Great article from Gamasutra

Ran across an interesting article on Gamasutra Game Artists: The Three Cardinal Rules by Keith Self-Ballard (Quoting the intro here) "What guidelines do video game artists need to follow to succeed? Volition manager Self-Ballard draws from his experience to suggest three key traits of the best game art creators."
There is nothing in the article about how to draw, model, or create art in anyway. It is instead all about how to conduct yourself in a working environment - and that is important stuff. Art school teaches you the tools and the craft of the job, but often neglects the dynamics of working with others.
I'm not going to recap the entire article (because you should just go read it!) but his first trait is all about being able to manage the ego and I totally agree with that. As artists creating work for others we walk a very difficult line. Yes, there are underlying principles to what makes good art or good design, but there is also a very large subjective factor to our field. I don't expect everyone to like every piece of art that I make. As I explained to another artist once "I don't expect to bat 1000, but that doesn't mean that I'm not trying to." As artists we're used to putting our heart and soul into our work. If that work is for other people, especially if they're your supervisors, their opinions matter and their judgement needs to be respected.
Again, give the article a read. Gamasutra has a bit of a reputation for well-thought out articles and this one is no exception.

2009-03-09

You want a piece of this?


If you'd like to try out Metaplace, just go here and where it says "Redeem your invite key!" enter the code MPARTHAUS

2009-03-08

Custom Floor Images, Part 2

Alright, if you followed Part 1 of this tutorial you learned how to easily slice an image up into pieces so you can use it as a custom floor tile. Now I'm going to show you an easy way to load those tiles into your world and lay them out in the right order.


I'm going to open up my world first. You can see the world I'm using for this tutorial here -Tile placement. Across the top of the screen look for the yellow "shape your world" button. Click on it and then click on the "paint the ground" button.


A side panel will open on the right hand side of the screen showing the tiles that are already loaded for your world. Look for the + sign at the top of this side panel. (I've circled it in red for you.)


Clicking on the + sign opens up a new sub-menu. Click on the triangle between the Y! and the words "What are you looking for?" You now see some more choices, including the one we're looking for "upload." Clicking on Upload calls up a new window. Within this window you can browse to the folder where you've saved your images. Select all of your images (use the Shift key to select a range of images at one time.) and then click OK.


All of the tiles you selected will be displayed in a new window. At the bottom of that window click on the button that says "create selected tiles."


The system will now display each of those graphics as an image, a tile and an inworld preview. Just click on the "next" button and work your way through all of them. After you get to the last one the creation window closes and you are back in your world. Look in the "paint the ground" sidebar and you'll see all of your new tiles there.

It used to be that you would have to laboriously work your way through all of the tiles placing them one by one. Then Obo wrote a very useful plugin called Batch Map Paint. How do you get it? Along your top menu bar go to add objects > from marketplace. Then do a search for Batch Map Paint and buy that puppy!


Now before we go any further you are going to need to know the coordinates of the tile where you want the image to be placed. In build mode click on the select object tool. Underneath it you will see a set of x & y coordinates that change as you move the cursor around the screen. (The picture makes this a bit more obvious.) Just round off the numbers. In this case that would be X=4 Y=5

Go ahead and open the console. To bring the console up, press the backtick (`) key in the upper left corner of most keyboards. To close the console, press enter while the console is active. On a UK keyboard layout ( ' ) opens the command line. Batch Map Paint requires you to enter the following

batch_map_paint prefix x y width height

Prefix is the base name that we used in back in Fireworks. In my case it was mucha

x and y are the map coordinates to begin painting we figured out this would be 4 5

width and height are the size of the area to paint. mucha was a 5x5 tile image

So in my case I would need to type:
batch_map_paint mucha 4 5 5 5

Hit the enter key and the magic happens! Now this may seem a bit complicated the first time or two you do it, but trust me it makes life a whole lot easier once you have got it down. Thanks again for creating the plugin Obo!

2009-03-06

Custom Floor Images, Part 1

FYI I'm using Fireworks 3 for this. We're using Fireworks because it will let us slice an image along a grid and we can save the resulting output as sequentially numbered PNG files.

Fire up the program and go to File > New to create a new graphic. Set the size to 320x320 pixels and the resolution to 72dpi. It's important to set the size to a multiple of 64. Why? Because the tiles in Metaplace are 64x64. We'll be making an image that covers a grid 5 tiles tall by 5 tiles wide so we need our graphic to be 320 pixels square. (5x64=320) Set your canvas color to transparent and click the okay button.


First off we want to set up our grid. Press Ctrl+Alt+G This will call up our Edit Grid window. We're setting a few things in here. (I cheated because although the screencap shows yellow as my color I changed it to red later. Doh!) From the top we have the color of the grid. Just set this to something bright that will stand out. Next make sure the check boxes are filled in next to "Show Grid" and "Snap to Grid." Finally set the size of the grid to 64x64 pixels. Now click on OK.


Now we need the Slice Tool. It is at the bottom right hand side of the Toolbox. I added a red outline in this picture to help point it out. Click on the Slice Tool to select it. Now go to the top left hand corner of your image. Click and hold the mouse button down and drag your cursor until it snaps to the first set of guides. (You'll end up with something like this.)

Continue working your way around the graphic until you have a slice for each of the 25 squares in your grid.

Now we're going to save the file. Why? Because it's a pain in the butt to draw all 25 slices and you shouldn't have to do it more than once. Hit Ctrl+Shift+S. Give it a nice simple descriptive name like 5x5floor. Now we have a handy 5x5 grid that we can use over and over.


Next step Ctrl+R or File > Import. We're going to bring in a picture and get it ready for slicing. After you take that first step you'll notice a little corner indicator tool. Just click within your graphic and the image is imported. You can see in my screencap that the image is larger than our 5x5 graphic. Let's fix that. But first let's make things a bit easier to see. We're going to turn off the visibility of those slices.


If your Layers palette is not already visible press Ctrl+Alt+L. Right now there should only be two layers: Layer 1 and Web Layer. Click on the eye graphic next to the words Web Layer. All the green stuff goes away! The slices are still there, they're just invisible for the moment. You can also still see the gridlines for a reference point if you need it.

Click on your imported image. (I'm using some great art by Alfons Mucha, btw.) Hit Ctrl+T. This puts you in transform mode. Just grab the corners of the rectangular guide and resize your imported image until it fits within the 5x5 grid. Be sure to hold down the Shift key while you're resizing so you don't stretch or squash the image. Hit Enter when you're done resizing.


It's time to export our graphics. Go to File > Export Preview (Ctrl+Shift+X) Export Preview gives you more choices in the output of the final image and choice is good. Under the option tab set the file format to PNG24 (You can also output PNG32 files - which = alpha channels = equals floor tiles with transparencies!) Click on the Export button.

The next screen let's you pick the base name you want to use with the files and where you want it saved. I used mucha for my base name to help me remember what the tiles are about. Make sure that under Slicing it says Use slice objects. For HTML you can set the style to None since we just want the images. Click on Save. Whoo hoo, we're done! Fireworks has sliced up our graphic into 25 even pieces and even went ahead and named all of the files for us. If you check the destination folder you saved the files to you'll see a bunch of graphic with names like mucha_r1_c2.png. The software took the base name and added the row and column position of the tile. Why should we care? Because Obo created a swell plugin that will read that info and automatically lay our tiles out in the proper order. Next time I'll show you how to use that.

2009-02-27

The Stained Glass Effect, Part 2

If you've been following along you hopefully have a nice, glowy, colored patch of light on the floor. To give it that extra little touch we're going to add some rays of light streaming down from the ceiling.

First thing I did was get a screen-grab of the room with the patch of light on the floor. I just find screen-grabs really helpful in making sure I've got objects sized right before I upload them to Metaplace.
I opened the image in Photoshop and created a new empty layer. On this layer I drew a number of colored blobs that matched the sections of floor beneath them. (The picture probably makes more sense than the written explanation for this little part.

Go to Edit > Transform > Scale and stretch the blocks out until they are vertical stripes of color going from the top to the bottom of your screen.

Go to Filter > Noise > Add Noise I used around 20%, Uniform Dsitribution and the monochromatic settings. Now Filter > Blur > Motion Blur with an angle of 90 degrees and a distance of 20 or so.
Now we're going to change the shape of the rays a little bit. Use Edit > Transform > Distort. Grab your corner control boxes and narrow the top of the box while stretching out the bottom. (Again, the picture should make more sense.) Lower the opacity of the stripes layer to about 30-40%.

Now we're going to soften the rays up a little. Hit the D key to set your foreground and background colors to black & white. Click on the Add layer mask button.

Now go to Filter > Render > Clouds. Let's tighten the contrast a bit. Use Ctrl+L to adjust your levels. Bring the right and left hand sliders in towards the center. Since the cloud function is random, just eyeball the effect you're getting until you see something you like. Switch to your brush tool, make sure you have a soft edge and paint some black over the lower edges of the graphic to match the curve of the circle of light (Once more: picture > convoluted verbage.)

Turn off the visibility for your background layer. (The one that held the screen grab of the floor.)All you will be seeing if the colored stripes over a transparent bkg. Go to File > Save as wenter a name for the file and change the file type to PNG. This is important because the PNG file format will save all that lovely alpha channel info we just created. The graphic is all done. Let's bring it into your world!
Load your world in the web browser. Go to Advanced > Sprites. Click on the + sign to add a new sprite. Next to the phrase "What are you looking for?" click on the triangle to open the sub-menu, then click on upload. A new window will open, allowing you to browse to wherever you just stored that ray file on your computer. Select the file and click on open. On the next screen click on create selected sprites. Close your sprite window.
Go to the get more stuff menu. then click on new object. Click on the pick from your world button. Find your new stripey rays sprite. Double click it. Click on the create button and you new object is done. Tweak the size up or down as need to get the circle of rays the same size as the circle of light you already built into the floor. Sit back and enjoy your work!

Meeping


Soon after you join Metaplace chances are very good you will get a little pop-up message that says "So-and-So meeped you!" Meeping is the Metaplace way of saying Hi/hey/I'm online now/I see you're online/etc... It's just a friendly interaction tool. You can even get badges in different categories. (Number of times you've meeped people, number of times people have meeped you, etc...) Meeps are also these little fuzzball creatures created by Raph Koster that you can find wandering around in lots of different worlds.
You don't know any of this the first time it happens. You get a message that someone meeped you and you wonder what the heck is meeping? So a lot of people who are new to the system end up confused. The staff at Metaplace were a little worried about this. (They are very into making things as easy to understand as possible.) So yesterday an announcement came out that they were going to keep the capability, but they were going to change the name of it. However, and this is very typical of how Metaplace staff handles things, they added "Feel free to post any questions or concerns here." with a link to a forum thread. The thread soon started building up with people asking them NOT to change the name. A campaign was started including a world with a planned protest rally.
I attended the rally and it was a cool thing. There were some odd aspects to it. Like anything on the internet involving more than two people there was some confusion about the issue. (Some people thought they were going to eliminate the meep creatures. One of the speakers talked about MP making decisions without input and I think that is totally off-base.) Late-comers would pop into the room and announce their arrival, interupting the speaker. One troll got me to fire up the /ignore command for the first time.
Raph and some of the staff came and conducted themselves as their usual class act. After letting people stand up and have their say Raph took the floor. You can read what he said here. But the end result is that meeping stays where it is.
As Raph noted in his talk, MP is full of passionate people. I think it is great that they recognize this and are willing to listen to the feedback of users so much. This is my first experience with an online virtual world. From what I understand there are other virtual worlds where a protest like the one I attended last night would never have been allowed to happen. I feel pretty lucky to be starting my virtual life in such an open and welcoming place.
I asked Raph is this was going to be his "It's alive!" moment, meaning the creation that he has poured so much time and energy into is now really taking on a life of its own. His reply: "Definitely."

2009-02-24

The Stained Glass Effect, Part 1


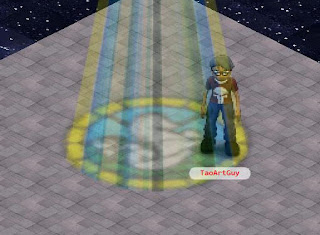
I wanted to create the look of light pouring through a stained glass window and casting a design on the floor. Here is the end result, that incorporates a couple of different tricks I used. Let's go through the steps and I'll explain how you can create the same thing. I used Photoshop CS2 for most of the work with a nice assist by ImageReady.
First of all we need a tileable floor pattern. I did some image Googling and found the above image. I then resized the image to be 64 pixels square. (The Metaplace default zoom has each tile being 64x64 pixels so I like to create my graphics at the same size.) Now use the Ctrl+A keystroke combo to select the entire floor graphic. Go to your menu bar and select Edit > Define Pattern Enter a name for the new pattern and click on the OK button. You've just created a new custom pattern that matches your floor tile.
Now we'll create a new document. We want this one to be 256x256 pixels. Why? Because that way the graphic will be 4 tiles across by 4 tiles high. Select All again (Ctrl+A, remember?)and go to Edit > Fill. 
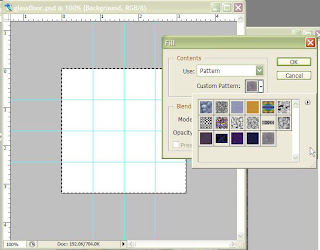
The new window that pops up will have a sections labeled Contents. Use the drop down menu bar to select Pattern. Then click on the triangle next to the words Custom Pattern. This will pop up the choices of custom patterns on your system, one of which will be the floor pattern we just created. Click OK and your graphic gets filled with the tileable floor pattern.

Now we need the stained glass image. You can search up something that you like. I decided to use the above image. Now there are a few things we need to do with this new graphic. First, paste it as a new layer into the floor graphic. Second, add a little blur to the image. This makes everything look a bit more realistic. The amount of blur is up to you and really depends on the type of floor you're trying to depict. I'm creating a rough, stone floor so I blurred the image more than I would have if it was a shiny, smooth linoleum floor. Third, rotate the graphic 45 degrees counter-clockwise. We're doing that because when we create the tiles in Metaplace the software is going to rotate the images 45 degrees clockwise, so we're compensating for that now. Last of all, lower the opacity of the layer down to around 37% and change it's blending mode to Hard Light.

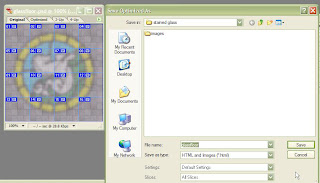
Our next step is going to be cutting the graphic up into a number of equal sized pieces. Add some guides both horizontally and vertically at the 64, 128 & 192 pixels mark. Go to File > Edit in ImageReady. This will start up ImageReady and open the file for you in that program. On your menu bar select Slices > Create slices from guides. Your graphic is now divided into 16 numbered boxes. Go to File > Save Optimized As. Enter a file name and change the type to "Images only". Click on okay. The nice part of using ImageReady for this is it does the laborious work of slicing, saving and sequentially numbering the images for you. The downside is that it only creates gif files.
We're ready to fire up the web browser and dial in to Metaplace! Go to your world and click on the build button. Click on the build your world button then click on the paint your map drop down button. At the top of the paint your map side panel there is a little row of icons. Click on the + sign to add some new tiles. The popup window that opens has a little triangle next to the phrase "What are you looking for?" Click on the triangle, then click on the word Upload. This opens yet another window where you can navigate to the folder where you saved all of the tiles in the previous step. Select all of the tiles. (You can use the shift key to select a range of tiles.)

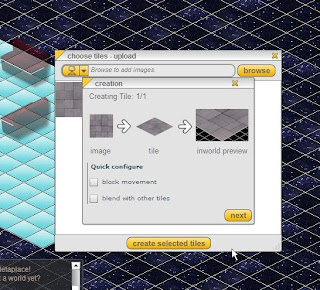
At the bottom of the window is a Create selected tiles button - click on it. You then can click on the next button to create all of the tiles.
When you finish that you're back in paint the map mode. Now you can just paint out the individual tiles in a 4x4 grid and there's your stained glass! Just like an incredibly easy jigsaw puzzle.

Next time we'll look at how to add some rays of light shining through the air.

2009-02-16

Dark Clouds and silver linings


Oh, the humanity! The Cloud Nine world did not get done in time. Since I am still learning what is and isn't possible (and how to do it) the concept I had was too ambitious for my available time and knowledge. I was having a heck of a time laying out the trails of clouds in the sky. I knew that was do-able since Raph had done that in his own world - Floating Islands. So I sent an email to Raph asking if he would point me in the right general direction. Not only was he nice enough to explain how he had down the graphics, but he gave me access to the Floating Islands world so I could look at the pieces close up. Thanks to his help I was able to build some tiles that in turn let me build a trail of clouds in the sky that people could walk along. There is still much more to be done in this world before I turn it public, but I am moving forward.
Yes, I know that is not the most exciting screen grab. That's part of why I didn't publish the world. I promise to make up for it in my next post.

The More the Merrier

There are a couple of other Metaplace Beta testers out there in the blog-o-sphere. Check them out!

The Metaplace Insider

Creative Aspirations

2009-02-13

On Cloud Nine


The Metaplace forums featured an announcement the other day for a Valetine's Day contest. Everyone was encouraged to create their own Valentine-themed world and then get together to vote for the one they liked the best. I'd done this once before when MP asked folks to put together a holiday themed world for the New Year. (You can see that world here, if you're in Metaplace. If you're not in the beta yet – drop me an email and I might be able to help you out.)

As an artist I've always enjoyed seeing the various approaches that different people will take to the same project. I decided not only to enter a world in the contest, but to document my efforts with a little build blog. So here we go!

First we need a concept. I like to steer away from the cliché when I can but with a holiday like Valemtine's it is not that easy. I thought about building some kind of Lover's Lane, toyed with the idea of an anti-love site, but neither idea really grabbed me. When I need inspiration I often Google various words and/or phrases. While looking at images of Cupid I saw an old Renaissance painting of some cherubs up in the clouds. Word associations started rolling through my head and up popped the phrase Cloud Nine.

Metaplace lets you use a number of file formats for creating graphics. Among them is the PNG format. One of the cool things about PNGs is that they can have alpha channels. This means you can have parts of an image be transparent. I could theoretically have cloud objects that fade out towards the edges and create the appearance that avatars are walking around on a cloud and partially sinking into it.

Alright! I'll do a Cloud nine world where the ground appears to be actual clouds that people are sinking into. Add some cherubs that can follow people around, mix in a Greco-Roman vibe for the visuals and it sounds like I have a plan.


Next time: a little proof of concept

2009-02-11

Artist unbound!


Hey folks,

just got the word that I am a member of the Metaplace Evangelist program. What is Metaplace, and what does it do, you ask? In their own words "Metaplace gives you the power to create, share, and live in your own unique virtual world." It's a digital sandbox, it's easy and it's fun. Geez, is it easy. My six year old son was playing with it the other day and having a ball.

It is also in closed beta right now. For those of you who don't know, that is the testing stage for software. A time to let in a limited number of people to bang on the walls and help shake the kinks out of the system. I was lucky enough to snag an invite to the beta. (Thank you Boing boing Offworld!) Beta also means you don't get to talk about the program. Kind of like Fight Club. But since I am now an evangelist, I get to share what I'm going through as I use the tools and build some hopefully cool stuff.

Now me, I've been a digital artist for a long time. This, however, is my first foray into online world creation and I'm going to bring you along for the ride. I'll be approaching this from the point of view of an artist - exploring the best ways to get your very own artwork into an online virtual world, sharing some tutorials and tips, highlighting the cool things people are doing with the Metaplace platform.

Next time - Tools of the Trade.