2009-03-26

MP Art Collective Q&A


The Metaplace Art Collective (of which I am one of the founders) is hosting a question and answer session with all three of the staff artists from Metaplace. You have a great chance to chat with the folks who actually get paid to create this stuff for a living. Come on by and pick their brains for all of the nuggets of graphical goodness you want!
Since some of these chats tend to be a little wacky LostBetween made a neat little question emoticon. I you want to ask a question during the chat just click on the question mark in the top left corner of the screen and grab a place in line between the red marks on the floor. I hope to see you there!

2009-03-20

He Might Be Giant


I had an idea for a game I'd like to do. I figured I'd complete most of the graphics for it and then team up with one of the Metaplace coders to finish the work off. It has already occurred to me how the graphic set could be used for another game as well. That's one of my biggest complaints about Metaplace right now - the tools offer so much potential! My focus keeps getting scattered as new ideas pop up. So I am trying to buckle down and limit myself to two projects right now. This one and refining my space station so I can publish it as a stylesheet.

Here is a little teaser image. I'm doing something different by trying to create all the buildings in Adobe Illustrator. I've used AI for isometric work before. But Metaplace isometric is slightly different. The work I'd done before required squashing the art 86.602% and then shearing and rotating the pieces through different positive and negative combinations of 30 degrees. I'm still working the last few kinks out but for the Metaplace art to look good it needs an additional squash. Something like 93.301% but I'm still tweaking. Yes, those are crazy numbers! I learned the isometric stuff years ago from a tutorial on the web so I will pay that back by posting a tutorial myself once I finalize the methods.

2009-03-13

Grand Theft Elmo


Haven't flogged my t-shirt design lately - so here we go. You can buy it here.

Great article from Gamasutra

Ran across an interesting article on Gamasutra Game Artists: The Three Cardinal Rules by Keith Self-Ballard (Quoting the intro here) "What guidelines do video game artists need to follow to succeed? Volition manager Self-Ballard draws from his experience to suggest three key traits of the best game art creators."
There is nothing in the article about how to draw, model, or create art in anyway. It is instead all about how to conduct yourself in a working environment - and that is important stuff. Art school teaches you the tools and the craft of the job, but often neglects the dynamics of working with others.
I'm not going to recap the entire article (because you should just go read it!) but his first trait is all about being able to manage the ego and I totally agree with that. As artists creating work for others we walk a very difficult line. Yes, there are underlying principles to what makes good art or good design, but there is also a very large subjective factor to our field. I don't expect everyone to like every piece of art that I make. As I explained to another artist once "I don't expect to bat 1000, but that doesn't mean that I'm not trying to." As artists we're used to putting our heart and soul into our work. If that work is for other people, especially if they're your supervisors, their opinions matter and their judgement needs to be respected.
Again, give the article a read. Gamasutra has a bit of a reputation for well-thought out articles and this one is no exception.

2009-03-09

You want a piece of this?


If you'd like to try out Metaplace, just go here and where it says "Redeem your invite key!" enter the code MPARTHAUS

2009-03-08

Custom Floor Images, Part 2

Alright, if you followed Part 1 of this tutorial you learned how to easily slice an image up into pieces so you can use it as a custom floor tile. Now I'm going to show you an easy way to load those tiles into your world and lay them out in the right order.


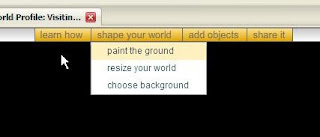
I'm going to open up my world first. You can see the world I'm using for this tutorial here -Tile placement. Across the top of the screen look for the yellow "shape your world" button. Click on it and then click on the "paint the ground" button.


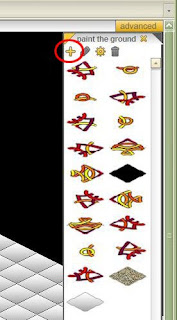
A side panel will open on the right hand side of the screen showing the tiles that are already loaded for your world. Look for the + sign at the top of this side panel. (I've circled it in red for you.)


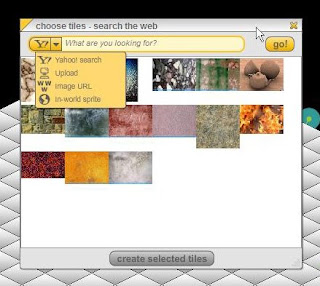
Clicking on the + sign opens up a new sub-menu. Click on the triangle between the Y! and the words "What are you looking for?" You now see some more choices, including the one we're looking for "upload." Clicking on Upload calls up a new window. Within this window you can browse to the folder where you've saved your images. Select all of your images (use the Shift key to select a range of images at one time.) and then click OK.


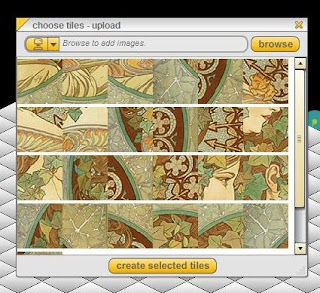
All of the tiles you selected will be displayed in a new window. At the bottom of that window click on the button that says "create selected tiles."


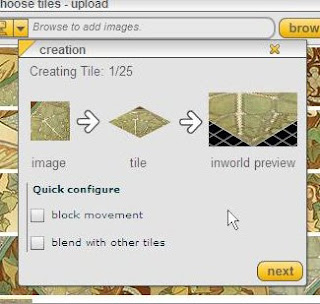
The system will now display each of those graphics as an image, a tile and an inworld preview. Just click on the "next" button and work your way through all of them. After you get to the last one the creation window closes and you are back in your world. Look in the "paint the ground" sidebar and you'll see all of your new tiles there.

It used to be that you would have to laboriously work your way through all of the tiles placing them one by one. Then Obo wrote a very useful plugin called Batch Map Paint. How do you get it? Along your top menu bar go to add objects > from marketplace. Then do a search for Batch Map Paint and buy that puppy!


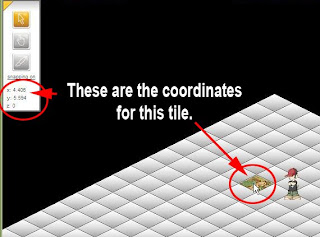
Now before we go any further you are going to need to know the coordinates of the tile where you want the image to be placed. In build mode click on the select object tool. Underneath it you will see a set of x & y coordinates that change as you move the cursor around the screen. (The picture makes this a bit more obvious.) Just round off the numbers. In this case that would be X=4 Y=5

Go ahead and open the console. To bring the console up, press the backtick (`) key in the upper left corner of most keyboards. To close the console, press enter while the console is active. On a UK keyboard layout ( ' ) opens the command line. Batch Map Paint requires you to enter the following

batch_map_paint prefix x y width height

Prefix is the base name that we used in back in Fireworks. In my case it was mucha

x and y are the map coordinates to begin painting we figured out this would be 4 5

width and height are the size of the area to paint. mucha was a 5x5 tile image

So in my case I would need to type:
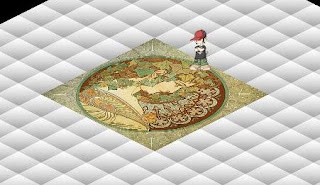
batch_map_paint mucha 4 5 5 5

Hit the enter key and the magic happens! Now this may seem a bit complicated the first time or two you do it, but trust me it makes life a whole lot easier once you have got it down. Thanks again for creating the plugin Obo!

2009-03-06

Custom Floor Images, Part 1

FYI I'm using Fireworks 3 for this. We're using Fireworks because it will let us slice an image along a grid and we can save the resulting output as sequentially numbered PNG files.
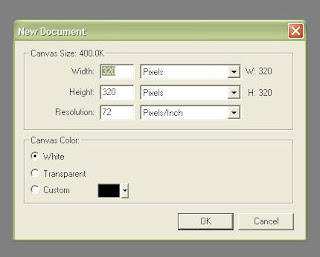
Fire up the program and go to File > New to create a new graphic. Set the size to 320x320 pixels and the resolution to 72dpi. It's important to set the size to a multiple of 64. Why? Because the tiles in Metaplace are 64x64. We'll be making an image that covers a grid 5 tiles tall by 5 tiles wide so we need our graphic to be 320 pixels square. (5x64=320) Set your canvas color to transparent and click the okay button.
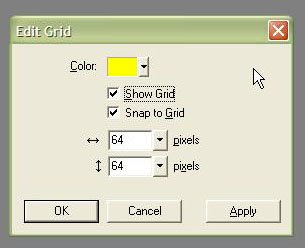


First off we want to set up our grid. Press Ctrl+Alt+G This will call up our Edit Grid window. We're setting a few things in here. (I cheated because although the screencap shows yellow as my color I changed it to red later. Doh!) From the top we have the color of the grid. Just set this to something bright that will stand out. Next make sure the check boxes are filled in next to "Show Grid" and "Snap to Grid." Finally set the size of the grid to 64x64 pixels. Now click on OK.


Now we need the Slice Tool. It is at the bottom right hand side of the Toolbox. I added a red outline in this picture to help point it out. Click on the Slice Tool to select it. Now go to the top left hand corner of your image. Click and hold the mouse button down and drag your cursor until it snaps to the first set of guides. (You'll end up with something like this.)
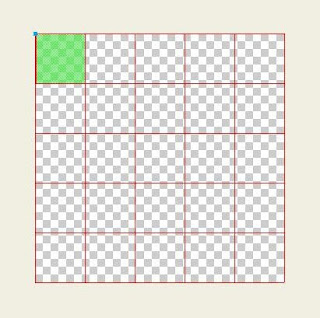
Continue working your way around the graphic until you have a slice for each of the 25 squares in your grid.

Now we're going to save the file. Why? Because it's a pain in the butt to draw all 25 slices and you shouldn't have to do it more than once. Hit Ctrl+Shift+S. Give it a nice simple descriptive name like 5x5floor. Now we have a handy 5x5 grid that we can use over and over.
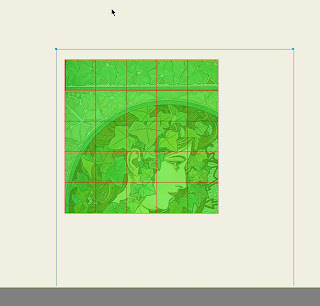

Next step Ctrl+R or File > Import. We're going to bring in a picture and get it ready for slicing. After you take that first step you'll notice a little corner indicator tool. Just click within your graphic and the image is imported. You can see in my screencap that the image is larger than our 5x5 graphic. Let's fix that. But first let's make things a bit easier to see. We're going to turn off the visibility of those slices.
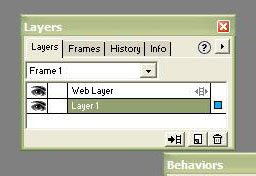

If your Layers palette is not already visible press Ctrl+Alt+L. Right now there should only be two layers: Layer 1 and Web Layer. Click on the eye graphic next to the words Web Layer. All the green stuff goes away! The slices are still there, they're just invisible for the moment. You can also still see the gridlines for a reference point if you need it.

Click on your imported image. (I'm using some great art by Alfons Mucha, btw.) Hit Ctrl+T. This puts you in transform mode. Just grab the corners of the rectangular guide and resize your imported image until it fits within the 5x5 grid. Be sure to hold down the Shift key while you're resizing so you don't stretch or squash the image. Hit Enter when you're done resizing.
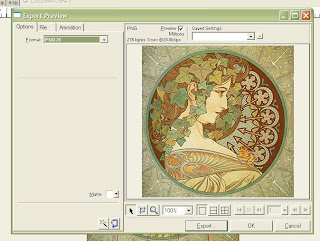

It's time to export our graphics. Go to File > Export Preview (Ctrl+Shift+X) Export Preview gives you more choices in the output of the final image and choice is good. Under the option tab set the file format to PNG24 (You can also output PNG32 files - which = alpha channels = equals floor tiles with transparencies!) Click on the Export button.
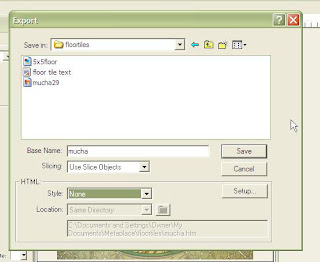
The next screen let's you pick the base name you want to use with the files and where you want it saved. I used mucha for my base name to help me remember what the tiles are about. Make sure that under Slicing it says Use slice objects. For HTML you can set the style to None since we just want the images. Click on Save. Whoo hoo, we're done! Fireworks has sliced up our graphic into 25 even pieces and even went ahead and named all of the files for us. If you check the destination folder you saved the files to you'll see a bunch of graphic with names like mucha_r1_c2.png. The software took the base name and added the row and column position of the tile. Why should we care? Because Obo created a swell plugin that will read that info and automatically lay our tiles out in the proper order. Next time I'll show you how to use that.