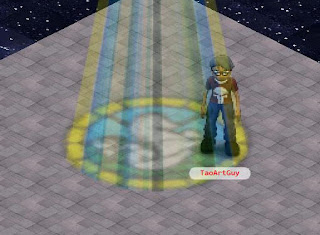
I wanted to create the look of light pouring through a stained glass window and casting a design on the floor. Here is the end result, that incorporates a couple of different tricks I used. Let's go through the steps and I'll explain how you can create the same thing. I used Photoshop CS2 for most of the work with a nice assist by ImageReady.
 First of all we need a tileable floor pattern. I did some image Googling and found the above image. I then resized the image to be 64 pixels square. (The Metaplace default zoom has each tile being 64x64 pixels so I like to create my graphics at the same size.) Now use the Ctrl+A keystroke combo to select the entire floor graphic. Go to your menu bar and select Edit > Define Pattern Enter a name for the new pattern and click on the OK button. You've just created a new custom pattern that matches your floor tile.
Now we'll create a new document. We want this one to be 256x256 pixels. Why? Because that way the graphic will be 4 tiles across by 4 tiles high. Select All again (Ctrl+A, remember?)and go to Edit > Fill.
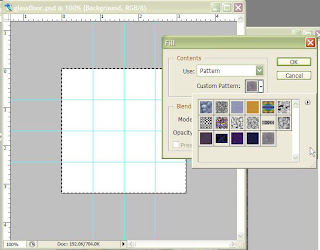 The new window that pops up will have a sections labeled Contents. Use the drop down menu bar to select Pattern. Then click on the triangle next to the words Custom Pattern. This will pop up the choices of custom patterns on your system, one of which will be the floor pattern we just created. Click OK and your graphic gets filled with the tileable floor pattern.
Now we need the stained glass image. You can search up something that you like. I decided to use the above image. Now there are a few things we need to do with this new graphic. First, paste it as a new layer into the floor graphic. Second, add a little blur to the image. This makes everything look a bit more realistic. The amount of blur is up to you and really depends on the type of floor you're trying to depict. I'm creating a rough, stone floor so I blurred the image more than I would have if it was a shiny, smooth linoleum floor. Third, rotate the graphic 45 degrees counter-clockwise. We're doing that because when we create the tiles in Metaplace the software is going to rotate the images 45 degrees clockwise, so we're compensating for that now. Last of all, lower the opacity of the layer down to around 37% and change it's blending mode to Hard Light.
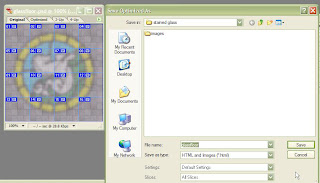
Our next step is going to be cutting the graphic up into a number of equal sized pieces. Add some guides both horizontally and vertically at the 64, 128 & 192 pixels mark. Go to File > Edit in ImageReady. This will start up ImageReady and open the file for you in that program. On your menu bar select Slices > Create slices from guides. Your graphic is now divided into 16 numbered boxes. Go to File > Save Optimized As. Enter a file name and change the type to "Images only". Click on okay. The nice part of using ImageReady for this is it does the laborious work of slicing, saving and sequentially numbering the images for you. The downside is that it only creates gif files.
We're ready to fire up the web browser and dial in to Metaplace! Go to your world and click on the build button. Click on the build your world button then click on the paint your map drop down button. At the top of the paint your map side panel there is a little row of icons. Click on the + sign to add some new tiles. The popup window that opens has a little triangle next to the phrase "What are you looking for?" Click on the triangle, then click on the word Upload. This opens yet another window where you can navigate to the folder where you saved all of the tiles in the previous step. Select all of the tiles. (You can use the shift key to select a range of tiles.)
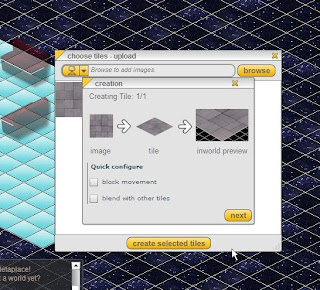
At the bottom of the window is a Create selected tiles button - click on it. You then can click on the next button to create all of the tiles.
When you finish that you're back in paint the map mode. Now you can just paint out the individual tiles in a 4x4 grid and there's your stained glass! Just like an incredibly easy jigsaw puzzle.

Next time we'll look at how to add some rays of light shining through the air.

No comments:
Post a Comment